
~~~Serving Ridgecrest and the entire Indian Wells Valley for 43 years ~~~

Kit #1-6FCD Installation Instructions
Kit #1-6FCD Installation Instructions
Installation summary:
-
Customers:
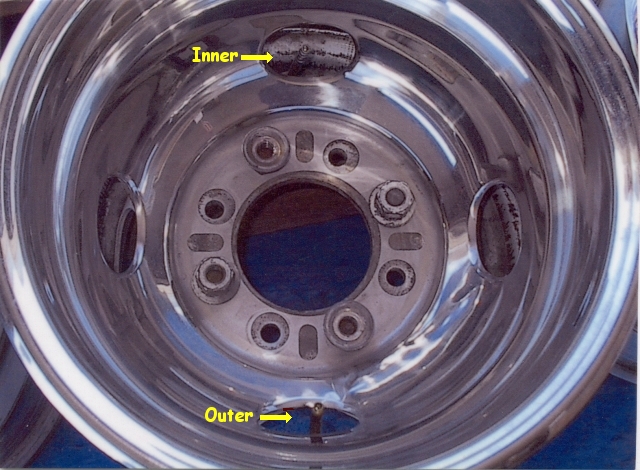
When the job is done, make sure no stem is touching the wheel simulators.
All kits are installed the same way. All valve stems will have a red mark on them. The stem should be installed with the red mark facing the tire. Make sure to use the blue thread locker supplied with the kit on all stems. These stems can be installed without dismounting the tire from the wheels. If your kit came with a rubber stabilizer it goes in the outer wheel, spray soapy water to make the stabelizer go in easier. The stabelizer does not go in the wheel liner.
When the job is done make sure no stem is touching the wheel simulators.
For early 4 hand hole Ford, Chevy, and Dodge duallys.
Things to Know Before You Get Started
- Tires do not need to be dismounted from rim to install this kit.
- This kit takes 1 tire technician approximately 2 to 2.5 hours to install which includes rebalancing of all 6 tires.
- The blue thread locker that comes with these kits is to be used on all stems.
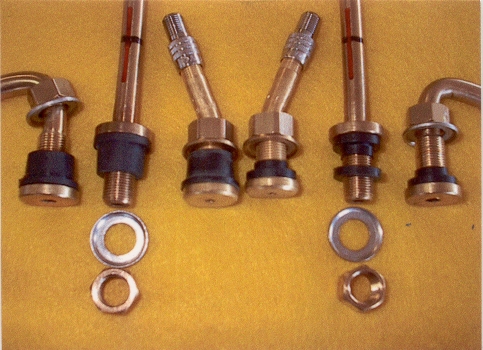
- Some kits for older wheels come with .625 rubber grommets and .453 grommets. Use the appropriate size and discard any remaining grommets.
- Only the valve stems with the nut on the inside will use 2 small gaskets (.453).
- Any valve stem with a red line on it, the red line will face towards the tire.
- Only the read-dual valve stem can be repositioned (bent). Do not try to modify outside valve stem.
- Only the .453 valve stem holes will use two gaskets if the nuts are on the inside.
- Each kit includes 3 valve stems assembled with .453 gaskets and 3 are assembled with .625 gaskets.
- Determine which hole your wheel has and reassemble with the appropriate sized gaskets.
Installation Instructions
- Get all 6 tires of vehicle off the ground 1 inch. If it has simulators, remove all 6 simulators. Unbolt front tires, install front stems, use one gasket each, rebalance tire and re-install on the vehicle tightening lug nuts to factory specifications.
- Move to the right rear, remove lug nuts. Remove wheels and take to the tire machine, deflate both tires. Take the inside wheel, break the bead of the tire, and remove the old valve stem. Take the long inside dually stem from the kit. Remove the nut, the concave washer, and flat rubber washer. Apply thread locker to the valve stems threads and insert through the valve stem holes in the wheel. Install flat rubber washer (if it's .453), concave metal washer, and nut. Torque valve stem nut to 45 to 55 inch pounds. Rebalance tire, lay on floor, stem up.
-
Repeat step 2 for the outer stem. Caution -- when placing this wheel
on the balancer and off the balancer make sure valve stem is at 6
o'clock (at the bottom). After rebalancing of outer wheel,
carefully set it on top of the inner dual that is on the floor. Make sure
that the stems are 180 degrees out from one another. Align all lug nut
holes. If you have simulators, now is the time to refit them to the wheels.
Make any adjustment to the long valve stem now. After adjustments, remove simulator. Take the wheels back to the vehicle and reinstall. Inside wheel with valve stem at 12 o'clock and outside dual at 6 o'clock. Tighten lug nuts to factory specifications. - Move to the left side of the vehicle and repeat steps 2 and 3.
- Reinstall all simulators and put on all 6 air through valve caps. Let vehicle down.
Note
- This kit takes one good tire technician approximately 2 to 2.5 hours from start to finish to complete.
- This dually kit works with 95% of all simulators on the market today. The other 5% will have to be modified slightly. (If modification is needed, make a small notch to allow the simulator to clear the outer wheel's valve stem.) Do NOT try to modify the outer valve stem.
| Kits Available: |
Kit #1-6DCF:
Fits older model Dodge, Chevy, & Fords Kit #2-6F: Fits late model E-350, E-450, & Ford trucks Kit #3-6D: Fits late model 17" Dodge duallys |
 |
| .625 / .453 Only Kit #1-6FCD comes with both sizes of grommets |
| Contact Info: | Chuck & Sue Carvitto | Toll-Free: | 1-888-889-8996 |
| 517 W. Inyokern Road | Kern County: | 1-760-446-3546 | |
| Ridgecrest, CA 93555 | Cell: | 1-760-382-1520 |
Dually Valve Stem Kit 1-6FCD
Copyright © 1999-2014 by Chuck & Sue Carvitto, all rights reserved
Website Design by David Flatman. Last updated 02/09/2015 .